Create fancy number and text popups for your game.
Easy to use and packed with features.
Click here for the new documentation.
Feel free to ask for support.
Discord ➞ https://discord.gg/nWbRkN8Zxr
Email ➞ ekincantascontact@gmail.com
- Unity 2019.3 (or higher)
- TextMeshPro 2.1 (or higher)
Supports:
- All Render Pipelines
- 2D and 3D Games
Click on the GameObject tab or the Plus button in the Hierarchy window.
Then navigate to "2D Object/Damage Number" to create a blank damage number.
2. Font Asset (optional)
Navigate to "Window/TextMeshPro/Font Asset Creator" and create a new Font Asset.
Click on the TextMeshPro button at the bottom of the damage number inspector.
Assign your Font Asset to the TextMeshPro component.
3. Customize
Enable and customize all the features you want in the damage number's inspector.
You can further change the appearance in the damage number's material.
4. Finally
You will reference your damage number later.
Save it as a prefab or keep it disabled in your scene.
You can find code samples on spawning damage numbers down below.
There is a function to make it easier though.
This function will also take care of pooling if it is enabled.
DamageNumber damageNumber = numberPrefab.CreateNew(number, position);You can change any settings you want after spawning (as seen in Advanced).
using UnityEngine;
using DamageNumbersPro; //Import Namespace

public class Example : MonoBehaviour {

    //Assign Prefab in Inspector
    public DamageNumber numberPrefab;

    public void CreateNumber(float number, Vector3 position)
    {
        //Spawn Damage Number
        DamageNumber damageNumber = numberPrefab.CreateNew(number, position);
    }
}
using UnityEngine;
using DamageNumbersPro; //Asset Namespace

public class Example : MonoBehaviour {

    //Assign Prefab in Inspector
    public DamageNumber numberPrefab;

    public void CreateNumber(float number, Vector3 position, Transform target, bool isHeal)
    {
        //Spawn Damage Number
        DamageNumber damageNumber = numberPrefab.CreateNew(number, position);

        //Follow Target
        damageNumber.followedTarget = target;

        //Color and Prefix
        if(isHeal)
        {
            damageNumber.numberSettings.color = new Color(0.5f, 1f, 0.5f); //Green Number
            damageNumber.prefix = "+"; //Prefix
        }
        else
        {
            damageNumber.numberSettings.color = new Color(1f, 0.5f, 0.5f); //Red Number
            damageNumber.prefix = ""; //No Prefix
        }
    }
}
- Bloom Post Processing
- HDR
Built-In Render Pipeline:
Enable HDR in your project's graphics settings.
Install the Post Processing package from the package manager.
Use the Post Processing package to add Bloom post processing to your project.
Universal Render Pipeline:
Enable HDR in your pipeline settings file.
Use the Volume component to add Bloom post processing to your project.
HD Render Pipeline:
Use the Volume component to add Bloom post processing to your project.
Configure Material:
Increase the Color Intensity in your damage number's material.
The glow will depend on your Bloom and Color Intensity.
Add a Sorting Group to the damage number.
Configure the sorting layer and sorting order in the Sorting Group component.
3D:
If you want the damage number to be visible through 3D models,
set it's material's shader to "TextMeshPro/Distance Field Overlay".
Open the package manager of your project.
Make sure you have TextMeshPro version 2.1 or higher installed.
Some numbers in the demo scene appear white.
Those numbers are supposed to glow.
Please look into the Glowing segment below.
Note though that the demo scene's postprocessing only works for the built-in pipeline.
I have some other issue.
Please send an email to ekincantascontact@gmail.com
Hopefully I can resolve the issue you have.
There are many ways you can boost performance though.
Enable Combination:
Combination will reduce the amount of simultaneously active numbers.
Enabling this can result in a big performance boost.
Enable Pooling:
Pooling will boost the spawn performance of numbers.
Disable Features:
Disabling features will also prevent their code from being executed.
You can do so by clicking on the toggle buttons in the inspector.
More performance improvements are coming soon... (likely this autumn)
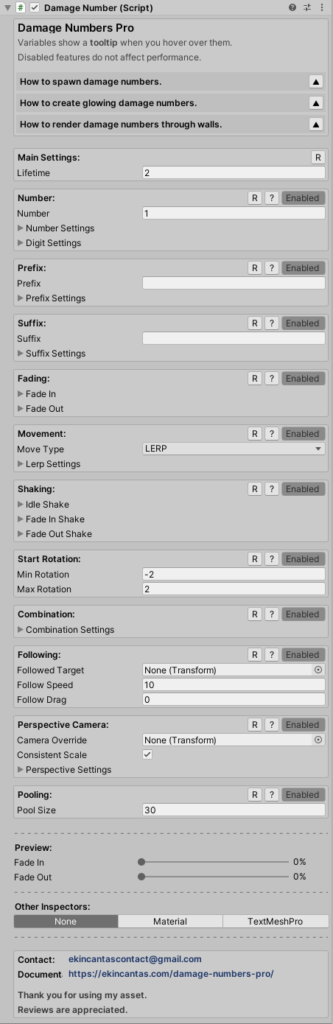
Custom Inspector
– Every variable has a tooltip.
– Features can be disabled and hidden.
– Disabled features do not consume performance.
– Most settings are collapsible for readability.
– Reset and hint button for each feature.
– Sliders to preview fading.
– Embed material and textmeshpro inspector.
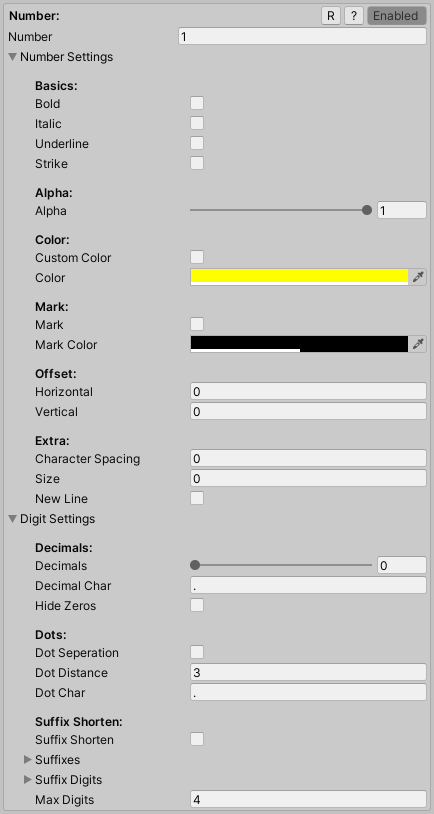
Number
– Has lot’s of text formatting options.
– Can be disabled to display text only.
– Can display a configurable amount of decimals.
– Can add dots for big numbers. (ex: 12.310)
– Can suffix shorten big numbers. (ex: 12K)
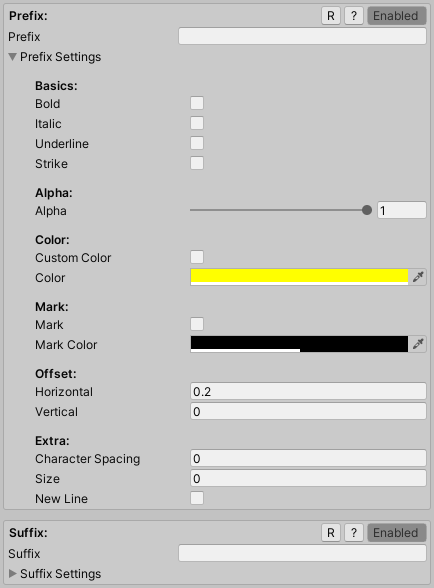
Prefix and Suffix
– Has lot’s of text formatting options.
– Displays text to the left or right of the number.
– Can also be above or below the number. (New Line)
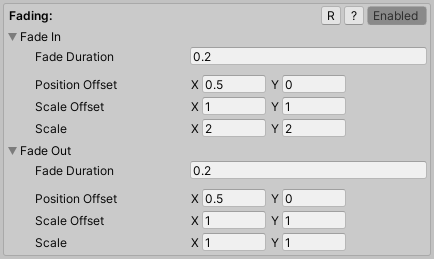
Fading
– Fades the damage number in and out.
– Always fades the text alpha.
– Fuses two textmeshpro’s by moving and scaling.
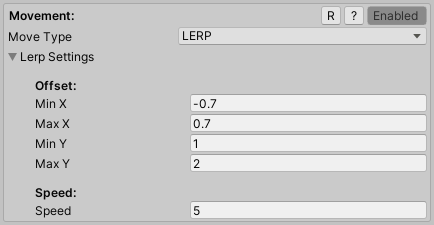
Lerp Movement
– Lerps towards a random offset.
– Easy to read as the number quickly slows down.
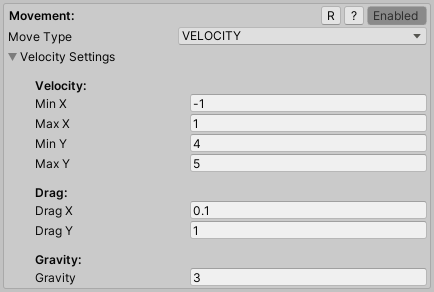
Velocity Movement
– Moves with a random start velocity.
– Has drag and gravity options.
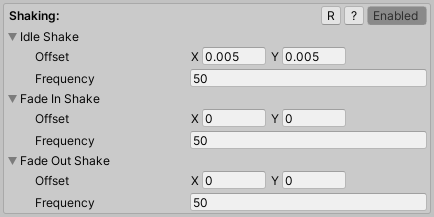
Shaking
– Shakes at a configurable frequency and offset.
– Can be used to add vibration.
– Can also be used to add motion to fading.

Start Rotation
– Spawns at a random rotation.
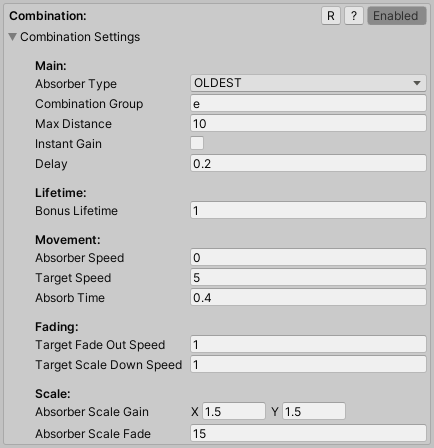
Combination
– Combines with other damage numbers of the same combination group.
– Combination will add up the number value.
– Can be used to keep spammed numbers more readable.
Hint:
Add gameObject.GetInstanceID() of the target to the Combination Group if you only want damage numbers which hit the same target to combine with each other.
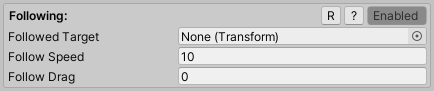
Following
– Can be used to make the number follow the hit target.
– Will try to maintain the offset it had to the target when it spawned.
– Drag will reduce the follow speed over time.
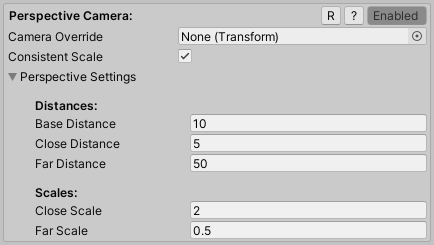
Perspective Camera
– Enable this for 3D games.
– Will face the main camera or (if set) camera override.
– Controls the damage number’s screen size over distance.

Pooling
– Boosts the spawn performance at the cost of some ram.
– Use the numberPrefab.CreateNew(…..) function to spawn damage numbers !
– You can use numberPrefab.PrewarmPool() to completely fill the pool.
– Each prefab has it’s own pool with it’s own pool size.